Thursday, July 28, 2011

Obsession Thursday

I skipped last week, because it was my lazy week.  By lazy I mean, I didn't do a darn thing!  Work totally drained me!  This week however I was on a mission.  A thrift store mission.  I love thrift stores!  Some are really good, some not so much.  It has to be somewhat organized for me to even step foot in.  I know weird right, you are probably like its thrift, you should dig, dig I do, but I like things to be in their proper places.  I usually go for my daughters clothes because she is growing so fast and I can't fathom paying $30 on one outfit for her.  I can't even fathom spending that much on myself!  I also buy most of her books there as well.  Have you seen how much Dr. Seuss is in regular stores??  It's crazy!  She's two so I don't feel so bad when she messes the book up.  I also love, love housewares and kitchen wares.  I buy stuff I really don't need but have to have them.  We are all like that on occasion right?  It's not just me right?!  Any ways, so that is what I did this week, went thrifting and got some good deals I have to share.  I got my daughter a bunch of clothes and a pair of cute pink sparkly sneakers.  The sneakers cost me $1.99.  I also have another crafting obsession and that is making tierd trays.  Yes I found it on a blog, and I have seen it so many other blog postings about it.  So I went out and bought some e-6000 glue, boy does that stuff stick!  Stinky, but works great.  Now every time I go out I am on the mission for pretty plates and glass candle stick holders and anything I could use as a stand.  Here is what I was able to find...
Don't mind the clutter in the back, hehe.  Ok so the red and green dishes I found yesterday and fell in love with them.  My everyday plates are green so that one green dish goes great, I can put roasted veggies in it, or mashed potatoes in it.  I like it instead of a regular bowl.  That can get boring after awhile.  It was originally $2.92 but because it had a pink sticker I got 40% off so I paid $1.75.  The red one is similar but has a lid and circles on it that are raised.  I paid full price for that but it was only $3.93.  That's really splurging for me, haha.  Now the tin contains twilight journals.  Yes I am a twi-hard.  Twi-mom, twilight obsessed, whatever you call it.  I love twilight.  I am not ashamed.  I love tins and I love journals and these full price were just too expensive for me.  When I saw them on the book self at the store I literally grabbed it, held it close to me and ran.  Yeah that's right, I ran, I was so excited I had to go show my mom and daughter.  Don't hate, twilight rocks.  Any who, I got that for $2.92!  What!  Cheap, love it!  The orange thing (which doesn't match a damn thing I own) are little bud vases but they are all stuck together.  I had to get it, it was so darn cute.  $1.91.   The brown bowls up front are like a paper mache type bowl, $.39 each, I can put like nuts or pretzels in it when friends come over.  The green bowl was like eh $.50 cents.  Again with the green, I love green dishes.  The ice cream dishes cost me $.69 and those are great for cake stands.  I bought a bunch of those.  The silver tray underneath cost me $1.99 and I plan on painting the tray part of it with chalk board paint and using it to showcase magnets I make to sell.  I can then write the prices on it with chalk. Cute idea right?  It would also be cute to display a menu for a nice dinner you are making for family and friends. 
All together on these items I spent around $19.  Not bad, I look at it this way, if I bought it at a regular store I would be paying a lot more money. 

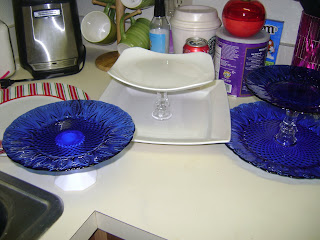
These are the cake stands I made, I love the blue glass dishes.  They cost me $.99 each, the white ones cost me $.69 each (I have another square white plate to make a single stand).  The red striped dishes in the back were $.69 each and I plan on taking those ice cream dishes and spray painting them red.  I think they would be cute around Christmas time to display Christmas cookies!  The glass candle stick holders I got at the dollar store.  The white candle stick holder cost me $.69.  Big spender I am, anything under a buck and I go crazy!  This little project cost me a total of......$9.11.  I am hoping I can sell those trays at the flea market, it also makes a cheap gift to give someone.  You can match it up to their kitchen!  Who doesn't like homemade gifts?  Well I hope you found some inspirations for your summer creations, check out your local thrift store!  One man's trash is another man's treasure!  That's for darn sure!

*Allie


Lazy Man Pancakes

Have you ever heard of the lazy man's pancake??  Dutch Babies??  Yeah, neither have I.  Until I found the world of blogging and all the wonderful recipes that come with it!  I found this one and just had to try it out.  Its one big "pancake" and I didn't have to heat up my griddle and dirty ten million different dishes.  Score!  The first time I made it, I put bananas in it.  It was ok, but I am one for color and when everything is the same color I can't stand it!  So the second time I made it was this morning and I had some blueberries left over.  Figured I have to do something with them, there weren't that many to make jam, so in comes dutch babies.  It's super easy and yummy.  Nothing fancy tho, quick thing to put together for breakfast when you are too tired to make a big spread.  


I love how it comes out so puffy, right out of the oven.  It doesn't stay like that tho :(  it falls.  But still is pretty cool to look at.  I like to let it sit for a bit, so the flavors blend.  You can even top it with some powdered sugar. 


1/4 c. butter (unsalted)
2/3 c. flour
1 T. sugar
1 c. milk
1/2 t. salt
2 eggs, beaten
any fruit ( I think berries work best)

Preheat oven to 400 degrees.
Put butter in glass pie dish and set in oven so it melts.  ( I use less butter, like half of that.)
Mix together milk, flour, sugar, salt and eggs. 
Once the butter is melted add the mixture to the pie plate, then add your handful of fruit.
Bake at 400 degrees for 25 minutes and that's all she wrote!

Enjoy!  The original recipe can be found here!

*Allie
 

Tuesday, July 26, 2011

Lists

So I start back at school in less then a month.  Insert sad face.  That means I won't have time to do anything, and because I can't afford day care (like a lot of other people in this country).  I had to set up my school nights on my only two days off during the week.  Talk about bummer.  My nights will be spent in english and algebra.  Then whatever spare time I have I will be doing computer class stuff online.  Not fun, I am super bummed that I don't think I will have a lot of time for crafts and organizing my life.  So after this week, which was my lazy week.  I am making a list of things that need to be accomplished before school starts back up.

1. Organize my pantry.  Its crazy in there, boxes are half empty and haphazardly thrown in there, candy and cookies are all over instead of being put into its designated place!  Oh!  And my Tupperware!  Don't get me started on that! 
2.  Make at least 1-2 new recipes a week.  Either a meal or a dessert.  I am finding so many new things I want to try.
3.  Make more wall hangings for family and myself from the the ten million tp and paper towel rolls I have in my "craft box".
4.  Make a bunch of tiered trays or single trays to sell at flea market.
5. Finally get around to making my thumbprint necklaces and or key chains for family.
(I have the actual thumbprint done, I just cant find silver spray paint and cant afford to go out and buy supplies!)
6. Knit a few baby blankets.  It's baby galore around here, everyone is preggo and having babies left and right, I want to make something from the heart.  I took a knitting class while I was preggo a few years ago, just cant remember the basics.  So I want to re-teach myself and get at least two completed before school starts.
7. Unpack the rest of these boxes in this house!
8. Organize my outside storage and patio, so we can enjoy it when it becomes cooler out.
9. Stop being lazy and get it all done!

So far that is all I can think of.  I'm sure I will add one or two more a week!

So on to number one on the list......

This is my pantry at its current state!  Horrible I know, I like everything categorized and lined up nicely.  This is embarrassing, so embarrassing I wont flip the picture so you can't tell just how awful it is!  So as I shame myself into organizing it, I will post pics once its all done and pretty!  I'm excited...that's kinda pathetic haha.


*Allie 

Wednesday, July 20, 2011

Taco Stuffed Shells=Yum!

So guess where I found this wonderful new recipe....yep you guessed it....pinterest.  Then from there I got the full recipe from here.  Their  pictures are much more prettier then mine, but mine tasted delicious! 

You know how everyone has taco Tuesdays?? Even Don Pablos, has unlimited tacos on Tuesday here in Florida.  I usually make taco salads.  I used to make the big shells, but now I just crush chips on top of salad haha.  Well some times that can get old, same with soft and hard shells, so when I came across this fantastically yummy recipe I just had to try it!

Here is my version (not much different from the original)

1 lb. ground turkey
1 pk. chipolte taco seasoning
4-6 oz. cream cheese
1 c. salsa
1 c. taco sauce
12 jumbo shells
1 pkg. mexican blend taco cheese (1 1/2c.)
tortilla chips ( I had some left over from chipolte, dinner the night before)
black olives, sliced; green onions; and sour cream for garnish

1.  Ground your turkey (or beef, which ever you prefer)  I drained mine, then added the chipolte taco seasoning (I didn't add the usual water to it so it would simmer), then I added the cream cheese and stirred until the cheese was melted and incorporated.  (I did use 4 oz. but next time I will use more, we love our cheese!)
2.  Let that cool, while cooling just boil the shells, I did al dente because you put it in the oven, but that doesn't really matter.
3.  Pour the 1 c. of salsa in the bottom of your casserole dish, stuff shells with yummy mixture and plop on top of salsa.  Then pour the 1 c. of taco seasoning on top of that.
4.  Cover that and bake at 350 degrees for 30 minutes. 
5.  After the 30 minutes is up take out and add your cheese and crushed up chips.
6.  Bake for another 15 minutes, uncovered.
7.  Slice up your olives and get your garnishes ready. 
See that's a lot of cheese, I ended up not using the full two cups that the original recipe called for because you can't see how pretty they are.

YUMM-O!

I served it with my rosita rice.  All that is, is white or brown instant rice mixed with the rest of the salsa and cheese, I then added black olives.  I usually add green olives, you could add that and some green chilies.  Its fast and delish!

I think they came out great!  Definitely will buy the chipolte taco seasoning (Ortega)  from now on.  It wasn't too spicy but did pack a nice lil punch to the dish! 

I hope you all enjoy!

*Allie

Tuesday, July 19, 2011

Epsom salts and pretty jars

So I am finally getting around to posting my craft I made last week.  I had some glass jars from pasta sauces I had used. I cleaned those out and removed the paper.  Took some mod podge I had and mixed it with food coloring.  I then painted it on the glass jars.  I did one green and one yellow.  I wanted green because I have green plates and green cups.  I had to do two coats on the green.  I think I should of stuck with one coat.

Finished project. I think they came out cute, if I ever have a nice dinner I will set these out.  If you don't mind the streaks and I don't, then it's an easy, and quick craft to do!  Costs nothing!

I put epsom salts in my jars, one because I saw some cute mason jars with them in it called snow, and it was a pain to put the candles in!  Here are some other crafts I found you can do with epsom salts.  Cheap too, found a nice size package at the dollar store!


If you click this you can find some pretty candles rolled in epsom salts.  It looks sparkly and pretty!

This would be a cute gift for someone and cheap to make as well!

Enjoy!

*Allie 

Monday, July 18, 2011

Science Lab

So last week I wanted to do something fun with zoe.  Lately she is painting non-stop and I happened to paint her a rainbow.  And what goes under rainbows??  Clouds!  I found this awesome little project to do with her.  All you need is ivory soap and a microwave.  Take the bar of soap and pop it in the microwave for two minutes and see what happens.  Zoe thought it was cool but was afraid to touch it!  (You can get a three pack of ivory soap at the dollar store!  Always good to have one hand when you want to make good smelling clouds!)


This was fun and it smelled good and cleaned up my microwave good! 

*Allie

Thursday, July 14, 2011

New Obsession Thursday

Obsession Thursday!

Here's the thing, I am kinda, well maybe really, really obsessed with pinterest.  It's like a nightly thing, I have to go on and find fabulous recipes and crafts to do.  Whether the crafts are for me, gifts for others or fun crafts I can do with the child.  I have found so many cool things to do.  One of them being wall decorations with toilet paper tubes.....I know right!  You at home probably throw away those little tubes when done, and I used to as well.  But when I found this one wall hanging I became ridiculously obsessed.  I won't lie.  I'm sure my hub is annoyed that there are tp and paper towel tubes are everywhere in our dinning room, but I made some thing really cool.  I even have requests from family members to make them some as well.  Thanks to my wonderful family and friends I am fully stocked in tubes and plan on making a ton of stuff with them.  I found on my new favorite site some new things to make.  Take a look.
Awesome, I think I might put this around my front door.
Love, Love, Love this! Can you even tell its from toilet paper tubes??
Genius!  Zoe loves butterflies right now.
Here is the original inspiration
Here is my creation :)
All it was toilet paper tubes, hot glue and black spray paint!

Now since I am still a novice at this blog thing, I don't know how I can make it where you click the pic and it takes you to the site.  Lame.  So I need to give credit where credit is due.  Below will be links where I found all these wonderful ideas!  I hope this is added to your summer creations list!

First picture I got from Love People Like Things
Second picture is from Condo Blue
Third picture I gots here BoBunny
Last but not least Design Sponge

Happy Obsession Thursday

*Allie

Turkey Burger anyone?

So I found this awesome recipe for turkey burgers.  I switched my family to ground turkey from ground beef a few years ago.  Its leaner and cheaper.  I usually make turkey loaf or Shepperd's pie.  But I found this recipe a few days ago and thought hmmm I already have one lb of turkey meat in my freezer why not go out and buy another pound.  So that's what I did, except I changed the recipe up a bit.  The original one called for lemon, mango chutney and parsley.  I switched out the mango chutney for cranberry chutney (I usually use this chutney with chicken thighs, orange and cinnamon), I used an orange instead of a lemon and used dried basil (only because the two stores I went to did not have fresh parsley, and I thought I had dried parsley at home....I did not, go figure). 
Must have your mise en place (french for everything in place).
Just chop up your celery, green onion and apple.  You can grate your apple like in the recipe above, I chunked mine and I think next time I will grate it because some of the chunks fell out while frying it up. 
Add the celery and apple to the pan and soften.  After a few minutes I added the green onion.
After that is done let it cool.  Combine your meat, Tabasco, salt, pepper, juice and zest from the orange and cranberry chutney.  (I should have used a little more chutney, I love that stuff!).  When the celery mixture has cooled just add it to the mix and combine it all together.  Its a wet mixture, so I formed my patties and put them in the fridge like the above recipe said.  I didn't leave it in for two hours, just maybe 20-30 minutes.
They look yummy and they aren't even cooked yet! 

What I did was fry it up a few minutes on each side.  Then I stuck them in a 350 degree oven for ten minutes.  You want to make sure these burgers are cooked to 165 degrees because it is turkey.  I then took some left over chutney and mixed it with mayo.  Yummo!  Put that on  the bun and added lettuce and the burger.  I could have made them prettier but last night was a tramatic night, so I did what I could hehe.  I also added provolone cheese to ours because well, we are cheese lovers.

I think they came out delish, you could really taste the basil, so I think next time I wont use that!  Just stick with parsely!  Here is my recipe.  I'm not one for measuring when I experiment, so I just added what I felt was good.

2 lbs. ground turkey (mine was 85/15)
1 1/2 apples, peeled, cored and diced (next time I will grate)
1 1/2 stalk of celery, finely chopped
1 green onion stem, chopped
oil of course for frying
1 orange, zested and juiced
2 T. cranberry chutney
Parsley to taste (I used dried basil, a few shakes)
1 t. tabascco sauce
1 t. black pepper
1 T. (scant) salt, I just used what I had

Sauce:
2 T. mayo
1 T. cranberry chutney
mix those two together, its delish. 

Enjoy!

*Allie

Past creations

So I have made one craft since I started this blog.  I know bad, its just been so hot.  It really drains you!  I have one planned for today in between napping and cleaning.  I'll post that another day.  But for right now, I will put up some of my fav creations from the past.  One of my favorite things to do is decorate Zoe's room.  The colors I picked for her room before she was even born was pink and green.  Oh the things I can do with pink and green!

The first two pics were made from the cardboard letters you can get at Micheal's (or any craft store) then I took different kinds of pink and green scrapbook paper.  It took a while to complete, because I only did it while the baby was sleeping.  I found these niefty stick on jewels so that completed it.  I'm thinking of custom doing them as a side business.  I think they are perfect for nursery's and smaller versions for adults. 
The Zoe on canvas was this cool thing I found at big lots.  It was five bucks and it came with stencils for the letters and paints.  So the whole project took cost me $15.  This was always a time consumer but well worth it!  The one thing I was really proud of was an old antique dresser my mom had.  It was white and I painted it jalapeno jelly green with pink drawer handles.  I can't find pictures of those unfortunately. 

*Allie

A day at the Zoo

Hello All!   Tuesday we took Zoe to the Tampa Zoo.  We had never been there before, but we have friends that live close to that area, so I thought it would be nice to head down there spend some time with them and see a new zoo.  Our zoo here isn't bad, but we have been so many times (we have a membership) that it kinda gets old after awhile.  I think Zoe had fun, I was so proud of myself for getting her bag packed the day before, snacks, juices, diapers, wipes, lil swimmers, bathing suit, first aid, sunscreen, bug spray.....yet I forget that its a 2 hour car ride and I brought the kid no toys to entertain her for the drive there!  She was good tho, didn't complain once.  Just looked really bored in the back seat hehe.  We get there just after it opened.  Which is the best time to go, before all the crowds hit.  The zoo was great!  They had so many animals.  Our zoo pales in comparison.  Zoe rode a horse for the first time, she petted goats, went on the merry go round, she fed a giraffe!  It was hotter then you know what, but we still had fun :)


 Zoe's first time on a pony!
 Feeding Billy the giraffe
 My favorite part, these two elephants playing in the water.

We had a great time, we want to go again, but I think we will wait until the weather is more pleasant!

Friday, July 8, 2011

Fun snacks and cake!

OK, so it took me literally all day to make these little things.  Why?  Because I kept going and doing other things, I made 35 and to sit there and unwrap all 35 Hersey kisses at once just doesn't work for me.  So I did little by little.....
I had the fun packs of m&m's and I am a little perturbed that with just opening 3 packages I got a little over 50 m&m's.  It doesn't look like much, but yeah just over 50 there!  Crazy, because I can open one package and insert it in my mouth like nothings wrong! 
and Viola......
I think they came out cute!  I was a little upset that the kisses cracked when pushing the m&m's in, I increased the time in the oven to five minutes.  I think next time I will do seven.  I brought them into work, because they are addicting, eating one turns into eating five.  Everyone at work loved them!  Next time I will try with rolo's.

So 4th of July just passed and instead of making an apple pie, I decided to make an apple cake that I found on a cool blog.  Nice story to go along with this.   You have to use ten small apples.  No biggie, I got them on sale .50cents a bag.  WHAT!  I know, apples are kinda expensive!  So I figured gotta use them quick then.  Any who...you have to peel, core and cut into small wedges.  No biggie.  Yeah right.  I get all ready.
Got my coffee, ready to go.  Go to find my corer and slicer (all in one) and can't find it.  So I had to peel (with a crappy peeler non the less) and core and chop.  No biggie, but since I have carpel tunnel and I did this first thing in the morning my hands were numb the entire time!  Not fun.  Finally after forty minutes I am done.  Then I had to add them all to a cup of sugar and two tbls. of cinnamon.  Two tbls!  That is all, I climb up to my spices cabinet, why I keep it above the fridge is beyond me (its a pain).  I discover I have no cinnamon!  I had to stop what I was doing, wake up the hubs to watch the baby and speed over to my moms all for two tbls of cinnamon!
These suckers had to sit for an hour.  Then I had to make the dough.  That was the easy part.  After the hour I assembled the cake.  Layer of dough, layer of apples, repeat.  This cake was not a fast one I tell you.
It had to bake for an hour and a half.  The house smelled awesome.  It was finally done, so I ran to my mom's house for the bbq.  I let everyone know they had to eat a piece, because of everything I went through. 
Everyone loved it. It came out delish, I think if there is a next time, that I will drizzle some carmel sauce on it. Yum! 
I also made these things, which were freaking awesome.  Cheesy deliciousness and I added some strawberries and blueberries to be festive.  It was 4th of July after all!

Have a fabulous weekend!

*Allie

Thursday, July 7, 2011

Quick treats

Good morning!  So I found this project, where else but on pinterest.  Thought it was so cute!  All I had to do was buy some pretzels and m&m's.  This whole project is costing me a whooping $2.00!  That's right, the pretzles are from our local Deals store and the candy I get for cheap at a food bank type place. (if that makes any sense).  Now I have the supplies just need to make it.  Here is where I first found it.  Simple and fast.  I will post pictures of the finished projects along with a tasty review!  I'm not even a sweets person, they just look so darn cute!

*Allie

Tuesday, July 5, 2011

New obsession

Have you heard of Pinterest?  Awesome, awesome site!  You can pinboard all you want.  There are thousands of different things on this site.  I have found so many awesome recipes, more blogs, more crafts. its great and its nicely organzied and saves everything for you, so you just pin it and its there forever!  Check out this site, you will be addicted!  You can find it here.  Enjoy!  

New to the blog world

Hi!  I'm Alex.  This is my first time blogging so I apologize ahead of time.  I wanted to start this blog, because well this summer I discovered so many wonderful blogs.  They are addicting!  Not only have I found these awesome blogs but I have found so many recipes and crafts to do, its crazy!  I took the summer off from school,  so I could rest and organize my life, but when I found these wonderful craft blogs I wanted to craft, and bake, and go thrift shopping and turn trash into treasure.  I want to upcycle anything and everything, I want to now learn how to sew so I can make all my daughters clothes!  The list is endless.  I should have started this when I found my new love of blogs but haven't had the time, so I will add my projects that have been done so far in the beggining and then when I start new I will add within a few days of doing it.  I hope that by sharing what I have found, it will help inspire someone to do something with their summer! 

*Allie

p.s. I am in no way computer savvy, so it will be a learning process for me, putting links and pictures and all that good stuff to share with you.
Related Posts Plugin for WordPress, Blogger...